How To Speed Up A Website
With today's fast pace, time truly is money! For this reason, users who surf the internet want to find solutions to their problems in the shortest time possible, and in this case, the 3-second rule does not give anyone any discounts.

It's proven that the majority of people immediately abandon a website if it doesn't load within 3 seconds!
But the bounce rate from a website is not the only aspect. In fact, the loading speed of a website is a very important factor regarding ranking on search engines. Google, which has always wanted to guarantee the best possible experience for users who use its services, has never hidden this aspect, encouraging programmers and webmasters to constantly improve the speed and use of content within a site.
So, if your website isn't performing as well as you'd like, consider doing a performance check. You can find many free tools online that allow you to analyze the speed of your site, listing the causes and solutions of any slowdowns encountered. Later, we will see which are the best-known and most used.
But how can performance be improved? Here are 6 tips to load website faster.
1. Choose the best hosting plan carefully.
There are many companies around the web that offer hosting services for all types of websites. Many even offer customized and ready-made packages for some of the most used types of CMS (Content Management System) (WordPress, Joomla, Wix, etc.).
The advice I want to give you is: choose your service provider carefully! Buying the service from the first person who comes along could give you problems not only in terms of speed but also in terms of security. Don't just rely on the price because it is a real investment for your business, whether small or large.
Usually, the offer is divided into shared hosting, which is an environment shared between various sites and often has a low cost, or dedicated hosting, which is a solution that allows you to have all the server resources for your project. Obviously, the second option is more efficient but certainly more expensive.
If you want to stay at a fairly low price, you can choose shared hosting with SSD drives, which is faster than one with hard disk drives.
The last (but not least) evaluation criterion is undoubtedly customer service. Make sure you purchase the service from a supplier that guarantees you quality technical assistance, on the web and by telephone, in the shortest possible time.
In this short guide, I will not tell you to choose one provider over another for the simple reason that the quality of the service must be evaluated depending on the project you intend to carry out. In any case, if you want to move your domain from another provider, you can do it without problems; you will only have to wait a few hours for the transfer.
2) Eliminate useless content.
Have you ever found a very nice graphic site with lots of animations? Surely. Animations and graphics certainly play a very important role within a website, but you should never overdo it. Every time you add an animation, you add a piece of code with it, so a lot of animations necessarily means a lot of code that adds weight to the website. Result? A slow website that takes a long time to load content.
Use only graphic content that can bring added value to your site, without overloading it with useless scripts.
A lighter page, with less code, will take much less time to load, and your blog or online shop could benefit from it.
3) Use a caching plugin.
The cache is basically the set of files, generally the most frequent and/or largest ones, which are downloaded and saved in the memory of the browser you are using to make the pages load faster. Caching can make your site 2-5 times faster. In addition to speed, configuring cache reduces strain on your server and improves user experience.
Depending on the CMS you use, there are many plugins that allow you to easily set up your site's cache. In the WordPress library, you are spoiled for choice. Below, I list some plugins to try:
• WP Super Cache: totally free and one of the most downloaded in the WordPress community. The plugin allows you to choose between simple and expert setup. If you have little experience, I recommend choosing the simple configuration, which is almost completely automated.
• W3 Total Cache: It is slightly more advanced than the first because it have many types of configuration. It has both a free, very complete, and a paid version.
• WP Rocket: If you're willing to pay, this is the most recommended option.
4) Optimize Resources (Files and Images).
when you upload content to your site, be it a blog article or a product, the image sizes are often overlooked.
Let me explain why. Imagine a user with a 100kb/s internet speed who doesn't have Wi-Fi and is browsing through Google with their mobile data. Now, consider a website filled with numerous unoptimized images, each around 100kb in size. Let's do some math. The user's internet speed is 100kb/s, and the website contains 5 images, each sized at 100kb. So, (number of images) 5 × 100 (size of each image) = 500kb (almost half a megabyte).
The user, wanting to visit the website, has to wait 5 seconds because their mobile data speed is 100kb/s, and the website weighs 500kb. This is why you need to optimize images before using them in articles. Google prioritizes mobile; even if you argue that 80% of your visitors use desktops, Google doesn't care. Google wants your site to be perfect for mobile users.
The latter can significantly affect the speed of a page, which is why it is good practice to compress them before posting. There are many free tools online that allow you to compress your images without sacrificing quality. One of the most effective and widely used tools is Tinypng.
If you have never done it in the past, try it now; you will immediately notice the difference in loading.
The above-mentioned plugins, in their more advanced features, allow you to minimize and compress HTML, CSS, and JS files, helping to reduce the total weight of resources.
5) Defer Render Blocking Resources.
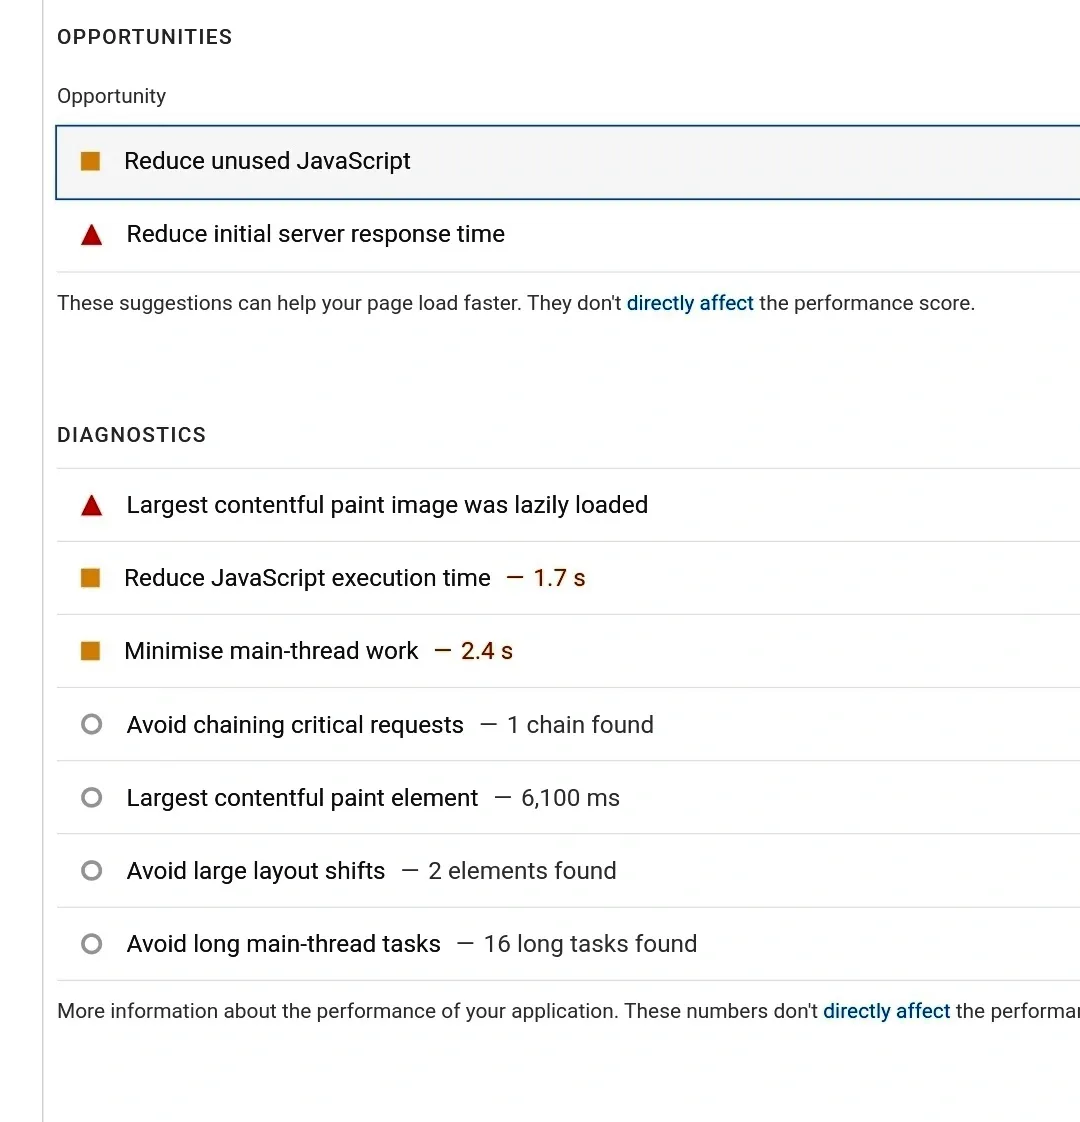
Render blocking resources are nothing more than files, such as JavaScript and CSS, inserted in the header that interrupt the loading of the HTML code. This happens because when the visitor opens our site, the browser begins to read the content from top to bottom. As a result, any resources that are inserted before the main HTML content are loaded first, making important information slower to load.
Okay! but how do I find out what these resources are on my site? And how can they be eliminated?
To find out what these resources are within your site, simply do an analysis using the tools I mentioned at the beginning of this article, which are: PageSpeed Insights by Google and GTmetrix.
Open one of the 2 tools in a tab, paste the URL of your website, and wait a few seconds. The tool will analyze all the problems slowing down your site, including these render blocking files.
 |
| Image : Page speed insights |
To fix this issue, simply install the Autoptimize plugin. It's as simple as that.
Step By Step Guide For Using Autoptimize Plugin
1. Install and Activate Autoptimize:
Go to your WordPress dashboard.
Click on "Plugins" and then "Add New."
Search for "Autoptimize," and click "Install Now." Once installed, click "Activate."
2. Access Autoptimize Settings:
After activation, find "Settings" in your WordPress dashboard, and click on "Autoptimize."
3. Optimize JavaScript:
Look for "JavaScript Options."
Check the boxes for "Optimize JavaScript Code" and "Aggregate JS-files."
4. Optimize CSS:
Scroll down to "CSS Options."
Check the boxes for "Optimize CSS Code" and "Aggregate CSS-files."
5. Defer Non-Essential JavaScript:
Find "Also defer parsing of JS?" and check the box.
This delays loading less critical JavaScript, making your site seem faster.
6. Consider Critical CSS (Optional):
If you're comfortable with technical settings, explore "Inline and Defer CSS" for critical CSS.
This loads essential CSS right away and defers less critical CSS for later.
7. Save Changes and Empty Cache:
At the bottom of the Autoptimize settings page, click "Save Changes and Empty Cache.
NB: You don't need to worry about getting the maximum score on analysis tools like PageSpeed Insights or GTmetrix. That score is determined by the combination of countless factors. The important thing is to test by opening your site on various devices and browsers, and check its speed.
6) Use CDN
A CDN (Content Delivery Network) is beneficial for speeding up the access to the contents of your website by users all over the world. In fact, depending on where your visitor is located, the loading speed will be slower the further away they are from the servers that host your site.
A CDN comes to your rescue in this. The primary advantage of using a Content Delivery Network is that your data is stored on multiple servers around the world, ensuring faster loading times for users who are far from your server.
One of the best free CDNs you can consider is undoubtedly Cloudflare.
All the suggestions provided here are to increase website speed. Many of these steps are within everyone's reach. However, I realize that approaching some types of operations alone can be complicated. Therefore, unless you are a 'geek,' the last piece of advice I give you is to rely on a professional.
You May Also Like
• 16 Tips to get adsense approval in first attempt
• 6 strategies to drive traffic to your website
• Why is google not indexing my pages?


